lab02 : ASCII Art: Logical operators, integrating github into your workflow
| num | ready? | description | assigned | due |
|---|---|---|---|---|
| lab02 | true | ASCII Art: Logical operators, integrating github into your workflow | Tue 01/30 09:00AM | Mon 02/05 11:59PM |
Pre-lab prep
-
Read this article on git basic workflow
-
Remotely log into your account on the csil servers and try to complete Step 1a of the lab that walks you through doing some initial ONE-TIME git configurations in your CoE account on CSIL.
*Read through the entire lab, and identify parts that seem unclear to you. You can let your mentor know about this at the beginning of the lab.
Goals for this lab
By the time you have completed this lab, you should be able to
- Use if/else and for loops to print various kinds of shapes with "ASCII Art"
- Show that you understand how to work through the basic process of test-driven development in C++
- Integrate github into your work flow
Skills Needed
By now, we expect that you are comfortable with these basic skills from lab00 and lab01 so we will no longer describe them in as much detail as we did previously:
- Using a text-editor to create and/or edit C++ programs
- Compiling and running C++ programs
- Using the computers in both the CSIL and the Phelps labs to do basic things:
- Performing basic management of directories and files with Unix commands such as mkdir, cd, pwd, ls, cp, mv
- Submitting assignments in this class with the submit.cs system, and checking your results
Step 0: Check-in with your mentor
-
At the start of every lab, you and your partner should get together with your mentor group and mentor. Your mentor will give you any initial instructions as required for the lab, guiding you on the key learning goals and any challenging aspects that you need to pay special attention to. They will also take your attendance for that lab. This is also a time when you will check in about your progress in the programming assignments. Make sure that you always have the latest version of your code pushed to github before your weekly check-in with your mentor.
-
If you reported a different partner to your mentor last week, please update your mentor before you proceed with the rest of the lab
-
Choose who will be the pilot for the first part of the lab. The pilot should sit down in front of the computer now. The navigator gets a chair and sits next to the pilot. You should exchange roles after awhile, before the pilot gets tired, and before the navigator gets bored or distracted.
-
If your partner shows up late, let your mentor know. Points will be deducted for students who don’t show up on time. If you face difficulties with pair programming consult your mentor.
Below are the links to different sections of the lab:
- Step by step instructions to getting setup with github
- Ascii Art
- An example for you to follow: starL
- What you’ll be doing
- Step by Step Instructions
- Evaluation and grading
Step by Step Instructions to getting setup with github
Step 1a: Do some initial ONE-TIME git configurations (this step has to be done individually)
-
On separate machines, log onto your account.
-
Open a terminal window. As a reminder, that’s the Application Menu, then System Tools, then Terminal Window.
-
In your ~/cs16 directory, type the following commands, replacing Alex Triton with your name and atriton@cs.ucsb.edu with your email address.
   git config --global user.name "Alex Triton"

   git config --global user.email "atriton@cs.ucsb.edu"
-
Next, generate a private/public key pair and upload your public key to your github account. To do this refer to this tutorial: https://ucsb-cs56-pconrad.github.io/topics/github_ssh_keys/ In the process of setting up your key pair, when asked for a passphrase just press enter. By doing this step you will avoid having to enter a password or passphrase everytime you push your code to git.
-
Clone the starter code repo from our class organization to the pilot’s local account by typing the following commands
git clone git@github.com:ucsb-cs16-w18/cs16-w18-starter-code.git
Note that this repo contains the starter code for all labs (although only the code for the current is up to date). So, you don’t have to repeat the above step in subsequent labs.
Step 1b: Create a new repo, add your partner as collaborator and clone the git repo that contains the starter code
-
Create a repo for this lab on the pilot’s github account (just like you did in lab00): To do this, open a browser and navigate to www.github.com. Log into the pilot’s github account. From the drop down menu on the left, select our class organization: ucsb-cs16-w18 and proceed to create a new repo. You may refer to the instructions in lab00. Follow this naming convention: If your github username is jgaucho and your partner’s is alily, your should name your repo lab02_agaucho_alily (usernames appear in alphabetical order). Also you must set the visibity of your repo to be ‘PRIVATE’ when creating it. We will not repeat these instructions in subsequent labs.
-
The pilot should add the navigator as a collaborator on github. To do this navigate to the git repo you just created. Choose the settings tab. Then click on the ‘Collaborators and teams’ option on the left. Scroll all the way down and add the navigator’s github account. Then press on the ‘Add collaborator’ button. Now you and the navigator share the ownership of your git repo. You won’t work with your new repo until the end of the lab.
-
Now navigate to the cs16-w18-starter-code directory, and do a git pull to get the latest version of the lab starter code. You must do this step again in subsequent labs
  cd cs16-w18-starter-code
  git pull
Never modify the code in the cs16-w18-starter-code repo directly because you are not the owner of that repo. Instead you should work on a copy of those files.
Step 2: Clone the repo in the pilot’s account and get the starter code
- On the terminal, change to your cs16 directory:
cd ~/cs16
- Using the web-browser, navigate to your newly created repo on github. Find the address of your git repo. Click on the green “clone or download button”. If your git repo was named lab02_alily_jgaucho, then the git address should something like: “git@github.com:ucsb-cs16-w18/lab02_alily_jgaucho.git”. Now clone your repo into your csil account by typing the following on the terminal, replacing the last argument with the address of your git repo
git clone git@github.com:ucsb-cs16-w18/lab02_alily_jgaucho.git
- Type ls to see your new git repo directory and change into that directory
cd lab02_alily_jgaucho
- Copy the starter code by typing the following command:
cp ~/cs16/cs16-w18-starter-code/lab02/* ./
You should see the following files:
$ls
backslash.cpp  README.md  starC.cpp  starL.cpp  starT.cpp  starZ.cpp
Step 3: Using the git command line tools to save the first version of your code
Its now time to use the git-command line tools to perform version control for the files in your git repo. The four essential commands we will be using are:
git pull
git add .
git commit -m "Initial version of lab02 files"
git push origin master
Go ahead and type them out on a terminal in your git repo (lab02_alily_jgaucho) directory. The above commands save a snapshot of your code on github. To check that this was done sucessfully open a web-browser and navigate to your repo on github. Then check to see that the starter code appears in your repo.
Note 1: Everytime you add a new piece of logic to your code you should save a snapshot of the latest version of your code by issuing the commands: git add … , git commit … and git push …. All the previous versions will be available to you as well and you have the option of reverting to older versions (We will see how in later labs). As you go through the rest of this lab you will essentially need to use these commands to keep track of the different versions of your code.
Congratulations on integrating git into your workflow! Now proceed to the programming part of this assignment.
Step 4: Create a team on submit.cs
- Go to submit.cs, navigate to CS16, W18, lab02, and create a team for you and your pair partner.
What we’ll be doing in this lab: ASCII Art
There was a time when laser printers either hadn’t been invented yet, or were not yet widely available. Thus, the only kind of printer most folks had access to was something called a "line printer", which printed only from left to right, top to bottom, and could only print the kinds of characters you find on a typewriter keyboard.
So, you might find folks making pictures like this one, found at http://chris.com/ascii/
                                 .ze$$e.
              .ed$$$eee..      .$$$$$$$P""
           z$$$$$$$$$$$$$$$$$ee$$$$$$"
        .d$$$$$$$$$$$$$$$$$$$$$$$$$"
      .$$$$$$$$$$$$$$$$$$$$$$$$$$$$$$e..
    .$$****""""***$$$$$$$$$$$$$$$$$$$$$$$$$$$be.
                     ""**$$$$$$$$$$$$$$$$$$$$$$$L
                       z$$$$$$$$$$$$$$$$$$$$$$$$$
                     .$$$$$$$$P**$$$$$$$$$$$$$$$$
                    d$$$$$$$"              4$$$$$
                  z$$$$$$$$$                $$$P"
                 d$$$$$$$$$F                $P"
                 $$$$$$$$$$F
                  *$$$$$$$$"
                    "***""  Gilo94'
For now, we’ll be keeping things much simpler: we are going to do some very simple ASCII art of letters, numbers and symbols, in order to practice with if/else and for loops.
The first few exercises will be very simple, but they get progressively more challenging.
An example for you to follow: starL
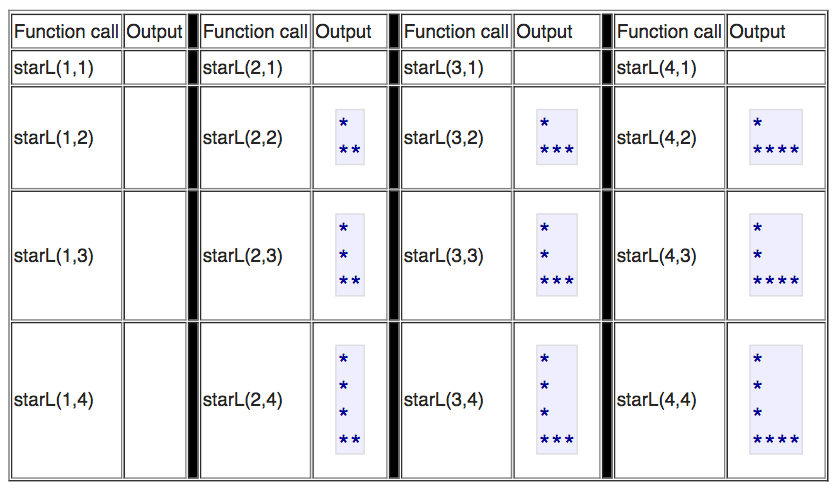
As an example, we will write a C++ function that returns a C++ string that when printed to cout, makes the shape of prints the letter L with stars, at any width or height, provided both width and height are >= 2
If either the parameter width or height is less than 2, the function returns an empty string.
The function will have the following function prototype:
string starL(int width, int height);
-
As a reminder, a function prototype is the first line of the function definition (the header) followed by a semicolon instead of the function body—it is used to introduce the function to the compiler, in case the function definition isn’t coming until later.
-
You can read more about function prototypes here: C++: function prototypes
The following table shows various calls to this function, along with what the string returned looks like when printed using cout << starL(w,h);
The rule is that the L should have width at least 2, and height at least 2, otherwise the result is an empty string, and printing an empty string results in no output.

So, this is a fairly easy function to write. This will do the job, and is provided for you as an example of how functions like this should be written.
To test whether this function works, we can write a simple main that takes the command line arguments, converts them to integers with stoi, and then passes those to the function:
What you’ll be doing
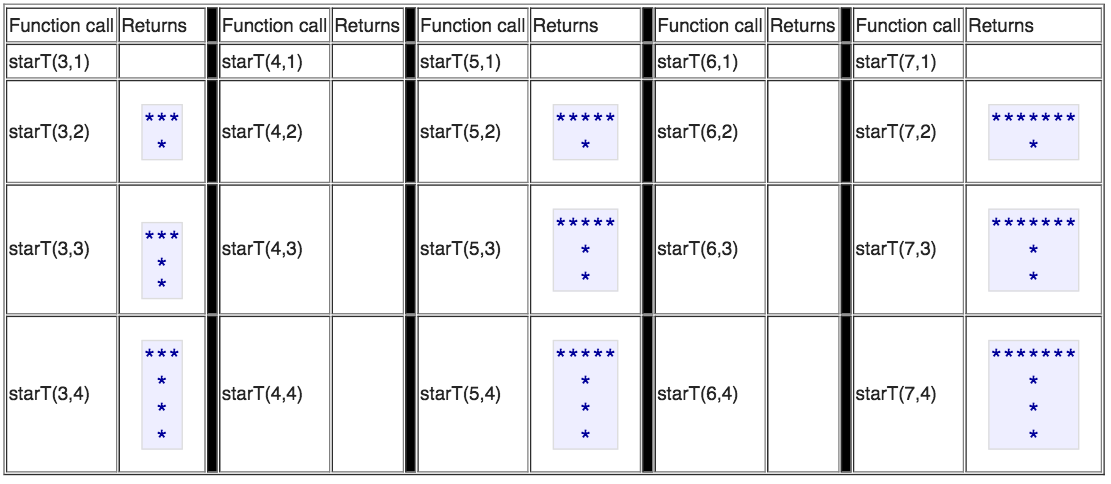
What you’ll be doing in this lab is writing three similar functions: startT, starC and starZ.
Sample values returned from starT

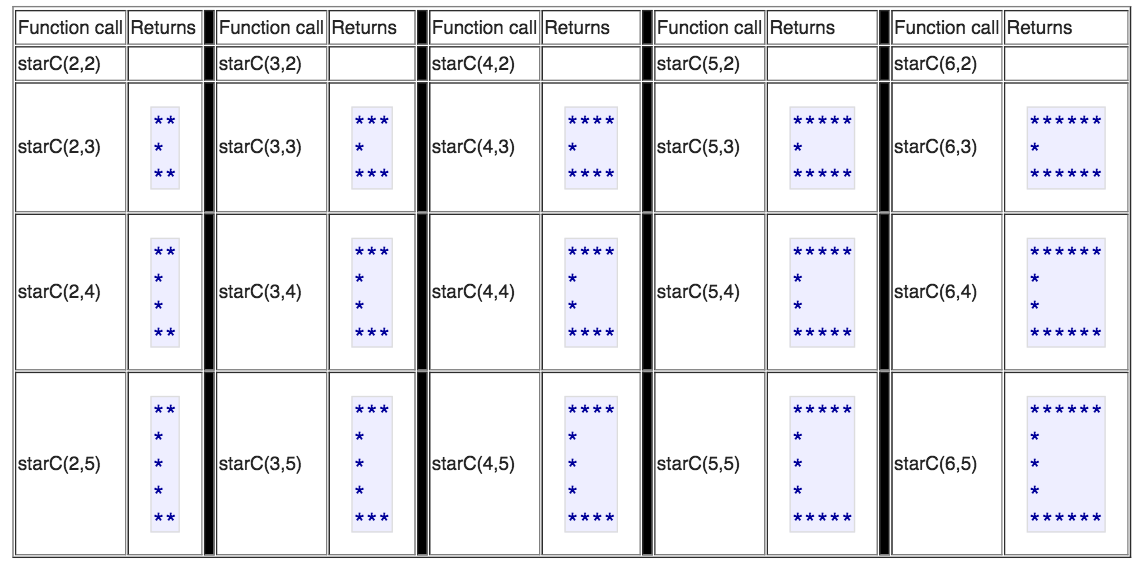
Sample values returned from starC
starC renders the letters C, but requires a minimum width of 2, and a minimum height of 3. Otherwise it returns an empty string.

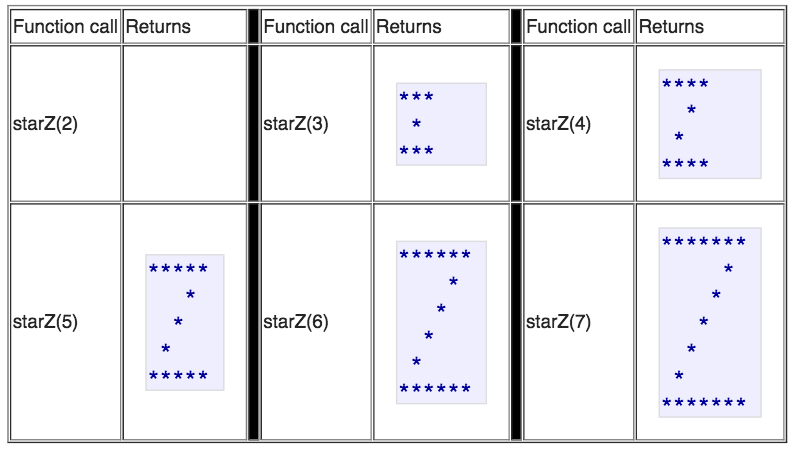
Sample values returned from starZ
starZ renders the letters Z, but requires a minimum width of 3. It only takes one parameter, because the height and width are always assumed to be equal.

Step by Step Instructions
Step 1: Practicing with the starL program
First compile the starL.cpp file that you have in this week’s directory with the option (-std=c++11 ) as per the following command:
g++ -std=c++11 -o starL starL.cpp
Run the program with a few command line parameters. You’ll notice something special happens when you pass in the command line parameters -1 -1.
 ./starL 3 4
 ./starL 4 3
 ./starL
 ./starL 2 1
 ./starL -1 -1
With the command line parameters -1 -1, the program runs a set of tests on itself to make sure that the function starL inside the program is functioning correctly. So, you should be able to get some feedback on whether your code is correct before you even send it to the submit program. The code uses stoi to convert the argv[1] and argv[2] to integer values, and compare against -1.
Look over the code and try to understand how it works. When you feel ready, move on to the next step, and try tackling the starT.cpp, starC.cpp and starZ.cpp programs.
Step 2: Writing the starT program
Your job now is to start edit the starT.cpp program, which has a function inside of it that is a “stub”. That function does NOT produce the correct output—it always just returns the string “stub”. You need to replace that code with a proper implementation of starT. You can use the implementation of starL in the starL.cpp file as a model.
Compile your starT.cpp to the execuatable star. Suppose we want your program to draw a T with width 3 and height 2, we will run your starT executable as follows:
$./starT 3 2
In general the parameters to the startT program are width, followed by height. You should take this into consideration when writing your main function. To write the starT() function refer back to the description of starT earlier in this lab. You can also run the program with arguments of -1 -1 to run the internal tests and see whether your implementation is correct.
When you think you have a correct implementation, try submitting to the submit.cs system. You can submit just your starT.cpp program to see how far along you’ve gotten:
~submit/submit -p 922 starT.cpp
Note that this will show failures for starC.cpp and starZ.cpp, which are files that you’ll be working on at a later step.
You could also just submit the “stubs” for those—though those will fail some or all of the tests:
~submit/submit -p 922 starC.cpp starT.cpp starZ.cpp
Either way, for now, concentrate only on the test failures that pertain to starT.cpp and try to address any problems you encounter. If you fix these NOW before moving on to starC.cpp and/or starZ.cpp, you will likely have better success, because what you learn from fixing your mistakes will help you get those other parts solved more quickly and easily.
Some rules to keep in mind for the starT function:
- EVERY line of your T should have exactly the same number of characters, and should end in a newline—remember to pad out each line with spaces.
- Return a string that represents the letter T with the correct width and height, but only if height >=2, and width is an odd number >=3
- if the height and width values are not valid, return an empty string
Hints: recall that:
- the
%operator can be used to test where a number is odd or even - the
&&operator means “and” - the
||operator means “or” - the opposite of >= is <, not <=
Also, for starT.cpp:
- If there are not exactly two command line args after the program name (one for width and one for height), print a usage message:
Usage: ./starT width height
- If the height and width are both -1, then invoke the internal tests. Don’t change those. If you do, then you may lose points.
Save the new version of your code with the starT implementation by typing out the following commands:
git add starT.cpp
git commit -m "Implemented starT()"
git push origin master
Step 3: Writing the starC program
Next, write the starC program. Follow the same basic procedure as for the starT.cpp program.
To get started, look at the table near the top of this lab that shows correct output for the starC program, as well as looking at the test cases in the runTests() function of the starC.cpp file in your directory.
Note that you’ll need to add some code to the main, but this time the rules are different. The minimum width is 2, and the minimum height is 3—everything else returns a null string (except for the values -1 for width and -1 for height—when passed in combination, the tests should be run.)
When:
- You can run your code with:
./starC -1 -1and all the tests pass - You can run your code on values such as
./starC 4 5and./starC 5 4and see the same output as what is shown in the table, AND - When typing in a command line that doesn’t have exactly two arguments after
./starCproduces the correct error message
then, you are ready to try testing your code on the submit system.
If you submit starC.cpp together with your starT.cpp program, your submit command will look like this:
~submit/submit -p 922 starC.cpp starT.cpp
(The order of the files doesn’t matter—list starT.cpp first, or starC.cpp first, aand either way, the result is the same.)
Note that failures for starZ.cpp may still show up, but we need not be concerned about those yet.
Concentrate only on the test failures that pertain to starC.cpp and starT.cpp and try to address any problems you encounter. Once all of those pass, move on to the starZ.cpp program:
Save the new version of your code with the starT and starC implementation by typing out the following commands:
git add starC.cpp
git commit -m "Implemented starC()"
git push origin master
Step 4: Writing the starZ program
For the starZ.cpp program, we have these rules:
- Take only one command line parameter: the width. The height will automatically be set equal to the width.
The starZ function follows these rules:
- return a string that draws the letter Z with the correct width and height, but only if width >=3
- return an empty string if the value passed in for width is not valid, print nothing at all.
Hints for the middle part of the Z:
- Take a look at the program backslash.cpp which is in your directory. Try compiling and running it. Look at the source code and see if there are any hints there.
- As you can see, it produces a backslash.cpp produces a backslash of a given width, as shown here. Look at the source code, and consider how you might turn backslash.c into forwardslash.c—in fact, that might be a good warm-up exercise for making the starZ.c program. Note that the backslash.cpp program does not contain an internal test harness.
- Note that the backslash.cpp program uses several “helper functions”. You might find that to be a useful technique in writing your own code. You may introduce whatever helper functions would be useful to you.
-bash-4.1$  ./backslash
Usage: ./backslash width
-bash-4.1$ ./backslash 3
*
 *
  *
-bash-4.1$ ./backslash 5
*
 *
  *
   *
    *
-bash-4.1$ ./backslash 2
*
 *
-bash-4.1$ ./backslash 4
*
 *
  *
   *
-bash-4.1$
As with starC.cpp, you should add code to starZ.cpp so that you are able to invoke the internal tests by typing ./starZ -1 . Note that this time, there is only one parameter.
And, if there is not exactly one parameter, there should be an appropriate “usage” message that follows the pattern of the other programs—except that there is only a width parameter in this program.
When you have a version that can pass its internal tests, try submitting it along with your starT.cpp and starC.cpp to the submit.cs system.
~submit/submit -p 922 starC.cpp starT.cpp starZ.cpp
If there are errors reported, fix them.
When you have a clean build, you are nearly done with this lab. I say “nearly” done, because you should take one last look over the grading rubric to see if there is anything you need to adjust before doing your final submit and calling it a day.
Note: You MUST make one final submission that includes ALL of your files. For getting incremental feedback while working on the lab, it is fine to submit one at a time, but for GRADING purposes, your LAST submission (in time) must be a complete submission of EVERYTHING. In the ideal case (for you), that submission is completely “green”, i.e. all test cases pass, and you have a perfect score (at least from the standpoint of the points you are awarded for passing the test cases.)
If there are parts you can’t figure out, be sure to submit all of your files anyway to maximize the number of points you receive based on the parts that ‘'’are’’’ working.
Make sure you do a final git add .., git commit … and git push .. to make sure the latest version of your code is available on github.
Evaluation and Grading
Correctness
- (150 pts) 15 tests, ten points each, executed by submit.cs system
End of lab check off points:
-
(10 pts) submission is on time and follows instructions
-
(10 pts) starT.cpp, starC.cpp and starZ.cpp files submitted have good header comments
-
(10 pts) Correct creation of the lab02 github repo in our class organization following the naming conventions provided in the lab. Adding your partner as collaborator and partner accepting the invitation. Both partners joining the same group on submit.cs
-
(20 pts) All three programs have good programming style, including proper use of indentation, reasonable choices for variable names, readable code, reasonable use of whitespace, and other good programming practices. You must have good header comments as illustrated in the coding examples done in class. First line should be the name of your file, followed by date of creation, author and a brief description of the program. You must use curly braces in the body of all control structures (if-else, for and while) even if they contain a single statement. You should not mix tabs and spaces when indenting your code